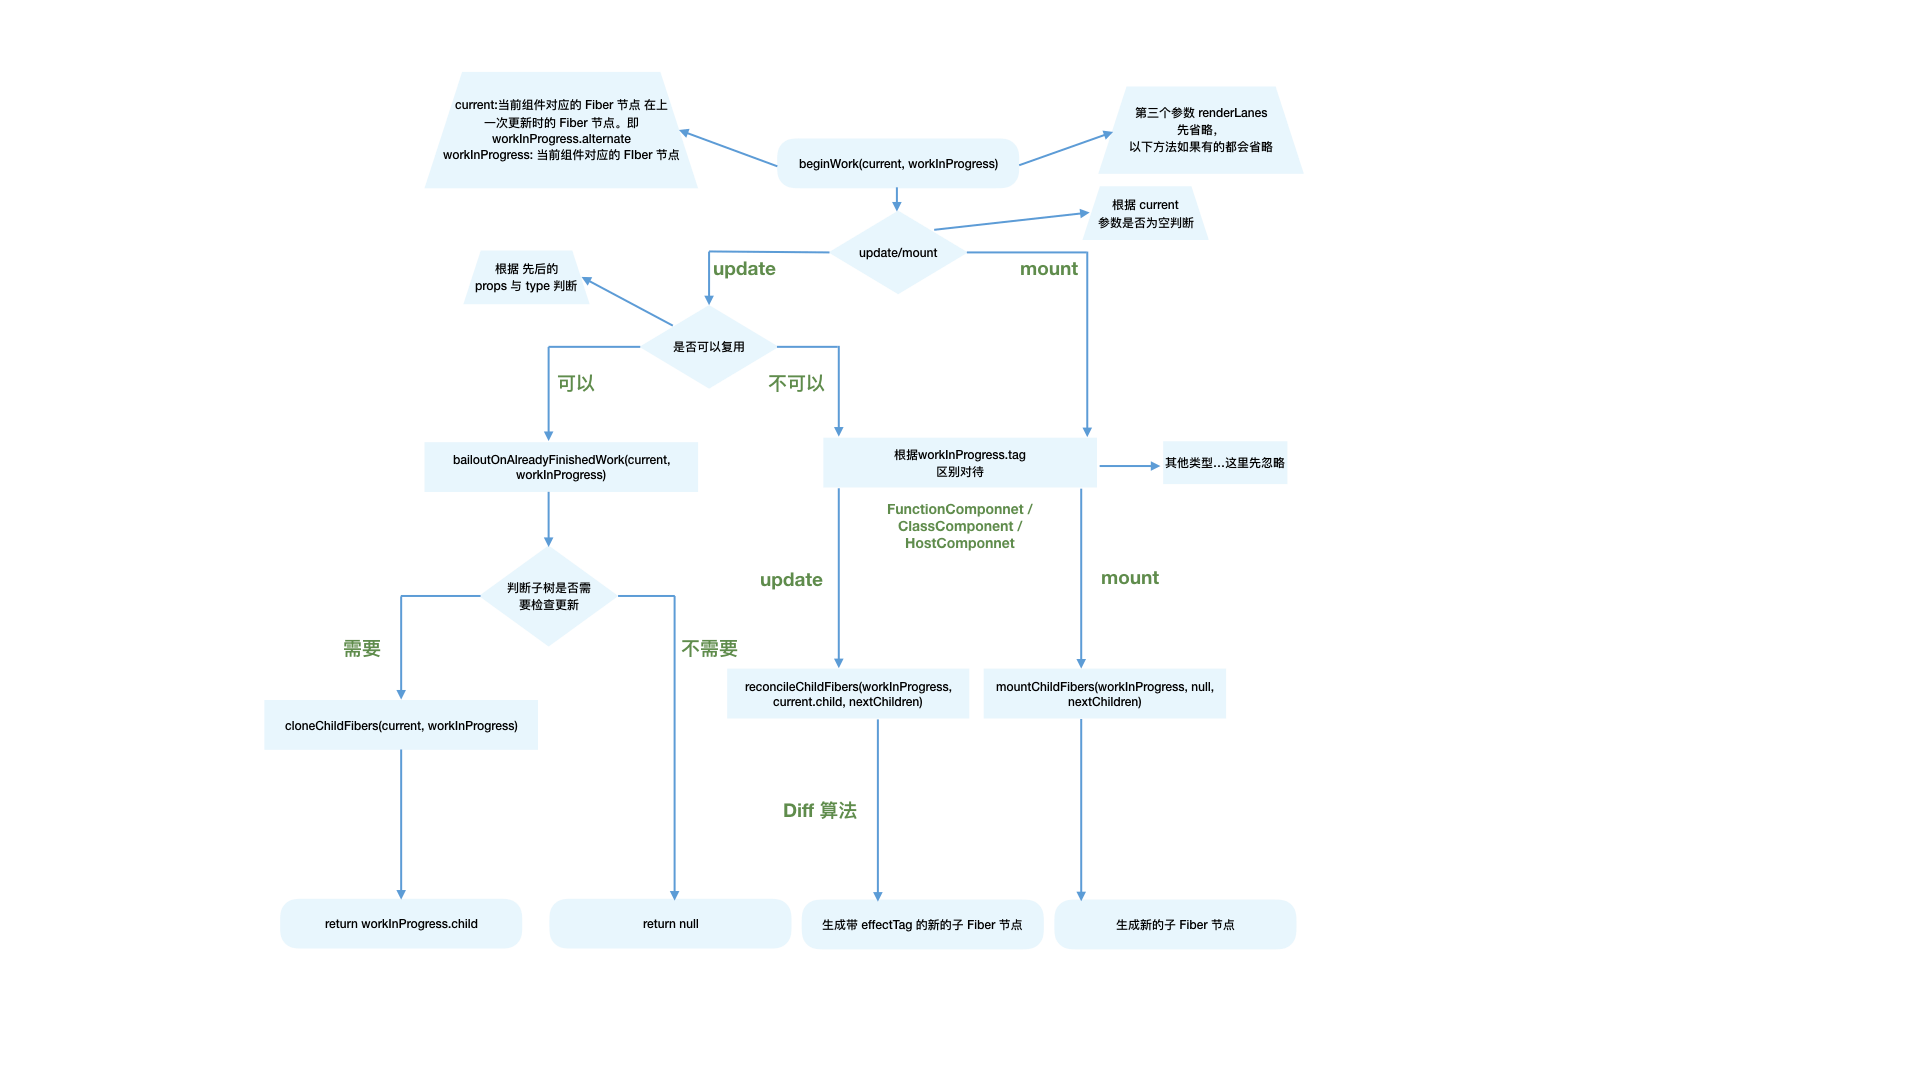
beginWork
上一节我们了解到render阶段的工作可以分为“递”阶段和“归”阶段。其中“递”阶段会执行beginWork,“归”阶段会执行completeWork。这一节我们看看“递”阶段的beginWork方法究竟做了什么。
方法概览
可以从源码这里看到beginWork的定义。整个方法大概有500行代码。
从上一节我们已经知道,beginWork的工作是传入当前Fiber节点,创建子Fiber节点,我们从传参来看看具体是如何做的。
从传参看方法执行
function beginWork(
  current: Fiber | null,
  workInProgress: Fiber,
  renderLanes: Lanes,
): Fiber | null {
  // ...省略函数体
}
其中传参:
- current:当前组件对应的
Fiber节点在上一次更新时的Fiber节点,即workInProgress.alternate - workInProgress:当前组件对应的
Fiber节点 - renderLanes:优先级相关,在讲解
Scheduler时再讲解
从双缓存机制一节我们知道,除rootFiber以外, 组件mount时,由于是首次渲染,是不存在当前组件对应的Fiber节点在上一次更新时的Fiber节点,即mount时current === null。
组件update时,由于之前已经mount过,所以current !== null。
所以我们可以通过current === null ?来区分组件是处于mount还是update。
基于此原因,beginWork的工作可以分为两部分:
update时:如果current存在,在满足一定条件时可以复用current节点,这样就能克隆current.child作为workInProgress.child,而不需要新建workInProgress.child。mount时:除fiberRootNode以外,current === null。会根据fiber.tag不同,创建不同类型的子Fiber节点
function beginWork(
  current: Fiber | null,
  workInProgress: Fiber,
  renderLanes: Lanes
): Fiber | null {

  // update时:如果current存在可能存在优化路径,可以复用current(即上一次更新的Fiber节点)
  if (current !== null) {
    // ...省略

    // 复用current
    return bailoutOnAlreadyFinishedWork(
      current,
      workInProgress,
      renderLanes,
    );
  } else {
    didReceiveUpdate = false;
  }

  // mount时:根据tag不同,创建不同的子Fiber节点
  switch (workInProgress.tag) {
    case IndeterminateComponent:
      // ...省略
    case LazyComponent:
      // ...省略
    case FunctionComponent:
      // ...省略
    case ClassComponent:
      // ...省略
    case HostRoot:
      // ...省略
    case HostComponent:
      // ...省略
    case HostText:
      // ...省略
    // ...省略其他类型
  }
}
update时
我们可以看到,满足如下情况时didReceiveUpdate === false(即可以直接复用前一次更新的子Fiber,不需要新建子Fiber)
oldProps === newProps && workInProgress.type === current.type,即props与fiber.type不变!includesSomeLane(renderLanes, updateLanes),即当前Fiber节点优先级不够,会在讲解Scheduler时介绍
if (current !== null) {
    const oldProps = current.memoizedProps;
    const newProps = workInProgress.pendingProps;

    if (
      oldProps !== newProps ||
      hasLegacyContextChanged() ||
      (__DEV__ ? workInProgress.type !== current.type : false)
    ) {
      didReceiveUpdate = true;
    } else if (!includesSomeLane(renderLanes, updateLanes)) {
      didReceiveUpdate = false;
      switch (workInProgress.tag) {
        // 省略处理
      }
      return bailoutOnAlreadyFinishedWork(
        current,
        workInProgress,
        renderLanes,
      );
    } else {
      didReceiveUpdate = false;
    }
  } else {
    didReceiveUpdate = false;
  }
mount时
当不满足优化路径时,我们就进入第二部分,新建子Fiber。
我们可以看到,根据fiber.tag不同,进入不同类型Fiber的创建逻辑。
可以从这里看到
tag对应的组件类型
// mount时:根据tag不同,创建不同的Fiber节点
switch (workInProgress.tag) {
  case IndeterminateComponent:
    // ...省略
  case LazyComponent:
    // ...省略
  case FunctionComponent:
    // ...省略
  case ClassComponent:
    // ...省略
  case HostRoot:
    // ...省略
  case HostComponent:
    // ...省略
  case HostText:
    // ...省略
  // ...省略其他类型
}
对于我们常见的组件类型,如(FunctionComponent/ClassComponent/HostComponent),最终会进入reconcileChildren方法。
reconcileChildren
从该函数名就能看出这是Reconciler模块的核心部分。那么他究竟做了什么呢?
对于
mount的组件,他会创建新的子Fiber节点对于
update的组件,他会将当前组件与该组件在上次更新时对应的Fiber节点比较(也就是俗称的Diff算法),将比较的结果生成新Fiber节点
export function reconcileChildren(
  current: Fiber | null,
  workInProgress: Fiber,
  nextChildren: any,
  renderLanes: Lanes
) {
  if (current === null) {
    // 对于mount的组件
    workInProgress.child = mountChildFibers(
      workInProgress,
      null,
      nextChildren,
      renderLanes,
    );
  } else {
    // 对于update的组件
    workInProgress.child = reconcileChildFibers(
      workInProgress,
      current.child,
      nextChildren,
      renderLanes,
    );
  }
}
从代码可以看出,和beginWork一样,他也是通过current === null ?区分mount与update。
不论走哪个逻辑,最终他会生成新的子Fiber节点并赋值给workInProgress.child,作为本次beginWork返回值,并作为下次performUnitOfWork执行时workInProgress的传参。
注意
值得一提的是,mountChildFibers与reconcileChildFibers这两个方法的逻辑基本一致。唯一的区别是:reconcileChildFibers会为生成的Fiber节点带上effectTag属性,而mountChildFibers不会。
effectTag
我们知道,render阶段的工作是在内存中进行,当工作结束后会通知Renderer需要执行的DOM操作。要执行DOM操作的具体类型就保存在fiber.effectTag中。
你可以从这里看到
effectTag对应的DOM操作
比如:
// DOM需要插入到页面中
export const Placement = /*                */ 0b00000000000010;
// DOM需要更新
export const Update = /*                   */ 0b00000000000100;
// DOM需要插入到页面中并更新
export const PlacementAndUpdate = /*       */ 0b00000000000110;
// DOM需要删除
export const Deletion = /*                 */ 0b00000000001000;
通过二进制表示
effectTag,可以方便的使用位操作为fiber.effectTag赋值多个effect。
那么,如果要通知Renderer将Fiber节点对应的DOM节点插入页面中,需要满足两个条件:
fiber.stateNode存在,即Fiber节点中保存了对应的DOM节点(fiber.effectTag & Placement) !== 0,即Fiber节点存在Placement effectTag
我们知道,mount时,fiber.stateNode === null,且在reconcileChildren中调用的mountChildFibers不会为Fiber节点赋值effectTag。那么首屏渲染如何完成呢?
针对第一个问题,fiber.stateNode会在completeWork中创建,我们会在下一节介绍。
第二个问题的答案十分巧妙:假设mountChildFibers也会赋值effectTag,那么可以预见mount时整棵Fiber树所有节点都会有Placement effectTag。那么commit阶段在执行DOM操作时每个节点都会执行一次插入操作,这样大量的DOM操作是极低效的。
为了解决这个问题,在mount时只有rootFiber会赋值Placement effectTag,在commit阶段只会执行一次插入操作。
根Fiber节点 Demo
借用上一节的Demo,第一个进入beginWork方法的Fiber节点就是rootFiber,他的alternate指向current rootFiber(即他存在current)。
为什么
rootFiber节点存在current(即rootFiber.alternate),我们在双缓存机制一节mount时的第二步已经讲过
由于存在current,rootFiber在reconcileChildren时会走reconcileChildFibers逻辑。
而之后通过beginWork创建的Fiber节点是不存在current的(即 fiber.alternate === null),会走mountChildFibers逻辑
关注公众号,后台回复531获得在线Demo地址
参考资料
beginWork流程图

